Place your non-dominant thumb between the cocked hammer and frame.
Grasp the grip with the dominant gun hand keeping the index finger off the trigger, keeping the gun pointed in a safe direction at all times!
Place your dominant gun hand thumb firmly on the hammer spur; then,
Insert your trigger finger of the dominant gun hand into the trigger well; with firm pressure on the hammer with your thumb, gently apply pressure on the trigger releasing the hammer catch.
Immediately remove the finger off the trigger.
Now you have your non-dominant thumb between the cocked hammer and pistol frame and finger off the trigger, with your dominant thumb holding back the trigger.
Slowly...slowly...release the hammer, using the hammer spur, with the dominant thumb, towards the non-dominant thumb; gently sliding the latter thumb out from between the hammer and revolver frame gently letting the hammer come to rest on the frame.
By doing this procedure, keeping the pistol pointed in a safe-direction at all times, if your finger is off the trigger, and should the hammer fall under its full force, you do not have a negligent discharge, provided the pistol is in good mechanical working condition.
If you don't use this procedure, and the hammer falls under full force, with the trigger engaged with the index finger or anything, the hammer block will not be engaged, preventing discharging of the weapon. You will be held responsible wherever that projectile lands. Practice with an unloaded revolver first. Then go to the range and, keeping the gun in a safe direction pointing down range, practice with a loaded gun. If you get a bang, you know you are doing something wrong! That's what the safe pointing direction on the range is for.
Preventing One Case of Revolver Lock-Up: There are a lot of revolvers out there; in fact, your editors read a few years back that the CIA, or those who protect the President of the USA--some have started carrying the .357 revolver again, after a brief infatuation with the semi auto. Whatever the case, one fact remains, America still has a love affair with the revolver. However, what is generally not known or taught nowdays is that under the stress fire of a gun battle in which someone is trying to kill you, your revolver may get you killed unless you know a certain technicality. Try it with an unloaded gun and know if your revolver meets this criteria under a stress-fire situation. A number of revolvers your WebMasters have worked with, including the Smith & Wesson, have fallen under this auspicies.
John Farnam in his series of law enforcement training videos references the above in Combat Reloading Your Revolver. He says to a group of police officers training from him that one malfunction of the revolver that can be avoided is a stress-fire "lock-up."
Under stress, your stronger muscles will out muscle your weaker ones. We have extensors and flexors. The extensors of the fingers, under stress, will be tend to open them, while the flexors will tend to close them. The flexors will win. For instance, if you are in a gun battle for your life, have a revolver in your hand, and are firing rapidly in burst, there will be the tendency---unles you have trained to overcome this---to not open the trigger finger enough. And herein lies the problem:
The extensor is trying to open the index finger from the trigger and the flexor (strongest, especially under an epinephrine (adrenaline) dump will resist even more strongly than the extensor, which is trying to open the finger enough from the trigger. This action can bring about lock-up that very few even know about, especially since revolvers have given way to the semi-automatic pistol.
Mr. Farnam points out that a state trooper actually was killed in a gun fight because he was not taught this. Such was the stress of the situation of his gun locking-up; the state trooper actually bent the metal trigger back in a vain attempt to get the gun to fire! They know this because they had to pry his dead fingers off his gun.
This did not have to happen, but the trooper's trainers obviously did not know this. You do! What's the solution? Simply, if your gun locks-up in a stress-fire situation, first, just release the trigger to allow it to go forward. Then resume the fight.
What mechanically happens in the Smith & Wesson is that the Single Action Sear does not disengage the Double Action Sear of the hammer because the trigger finger did not release the trigger fully forward. The solution once again:
Release the Trigger
To show how this happens--how to undo it, we use a clear side plate: LockUp
You can get the Ankle Holster for different types of pistols (revolvers & semi-autos) at Action Direct: www.action-direct.com (1-800-472-2388, Ext. E631 Mon-Fri 9-5 EST)
If you have or get an ankle holster:
Wear it; get used to it.
Practice with it.
Learn, discover, and overcome your weak points with it.
Make sure it works well with your pistol. Practice inserting your unloaded pistol and withdrawing the gun numerous times with your chosen holster.Do It This Way: Keep the holster and gun pointed in a safe direction at all times on the range (pointed down range), without the holster strapped to your ankle. Some holsters, though made for a particular pistol, retracted the trigger back when the gun was inserted into the holster, firing the firearm. This was for a hip/side holster made for a particular Glock. That has been corrected. But...play it safe. Practice first with any holster and gun pointed down range not attached to your hip or ankle.
Status Check: Always Do A Status Check To ascertain condition of Gun--make sure it is Unloaded Prior To Disassembly For Cleaning and So Forth....
Remove Magazine.
Check barrel, magazine well, and breech area doing a tactical and visual inspection. Remove cartridge if found.
Rack slide back several times; let go; point in a safe direction and pull trigger.
Hammer Down: Have The Hammer in the Down Position.
Turn barrel bushing to right side of gun. Be Careful ! The barrel bushing is under spring tension and can fly off causing injury and be lost if not kept under control until the tension is released slowly while under control.
Ease Plug forward.
Cock Hammer
Move slide back to half moon on slide. Align with top rear of slide stop.
Push slide stop from right side of gun on slide stop shaft to the left side of the gun.
From left side of gun, pull slide stop from gun.
Move slide assembly forward off the gun frame.
Remove from Slide Assembly
Recoil spring and guide.
Align barrel bushing with left side of slide and remove.
Tip barrel link forward to clear recoil spring tunnel.
Depress the retainer plate with a small size punch downward; prepared to catch the firing pin under spring pressure.
With the retainer plate removed, the firing pin and spring can be removed.
With the retainer plate and firing pin removed, the extractor can now be gently pried free at its round head piece to the slide's rear.
Grasp the round headpiece and remove from the slide.
Detail Stripping of The Frame:
Remove the mainspring housing retaining pin from the rear grip frame edge.
With the hammer down, use a punch of appropriate size to drift out the pin of the mainspring housing.
Now, the mainspring housing can be pulled from its chute on the frame. If tight, cock the hammer and push away from gun frame body.
With the hammer cocked:
Position the safety to a near on-safe and pull the safety to the left side of the gun, removing it.
With the safety removed, you can now remove the grip safety to the gun's rear.
The leaf spring powers the sear, disconnector, trigger, and grip safety, it can now be removed. Study the way each is in place before removing to facilitate reassembly.
Using a proper size drift tool, push gently and remove the slide stop plunger, plunger spring, and safety catch plunger (spring and plungers supply tension to the slide stop and manual safety).
Remove the hammer pin starting from the right side to the left side of the gun with proper size drift tool.
Now, the hammer can be removed.
Removal of the sear & disconnector is optional, unless damaged. Do so by using a proper size drift tool and push the pin out from right side of the gun to the left.
You can now remove the sear/disconnector. Notice its orientation to each other and to the gun for reinstallation.
Remove the slotted head of the magazine release with a proper size screwdriver. Turn the slot of the magazine head to the left and at the same time keep the magazine release lever depressed, not all the way out.
The magazine release retainer is now locked in place and the magazine release can be taken out from the right side of the gun.
After the magazine release is removed, the trigger comes out easily to the rear of the gun.
Grip Removal (Recommended) For Cleaning is Optional.
Gun is now Detail Stripped
Note:
You can order books and videos from Brownells, World's Largest And Most Trusted Supplier of Firearms Accessories and Gunsmithing Tools (800-741-0015), concerning the above operations and more.
Malfunction Drills:
It needs to be made clear that a malfunction is not a "jam." A true jam will take a great deal of time to correct, while a malfunction is usually minor in nature and can be remedied in less than a second or two. With practice, most malfunctions can be cleared, and you can be back in the fight in less time than it takes for some people to deliver an aimed second shot. There are two types of malfunctions:
Stoppages: Can be cleared easily, (Autos).
Jams: Major Malfunction such that the shooter can't restore firearm to functionality quickly, (Revolvers).
Auto (aka: auto--loader/self--loader/semi-automatic; all are the same type of pistol action).
Click: Gun fired; next round didn't chamber. Cause: Bad cartridge or Magazine not seated. Solution: Tap magazine with palm of free hand. Pull slide back. FIRE! Mnemonic: Tap, Rack, Bang.
Explanation:
This "is probably the most common malfunction in a semi-automatic pistol after the first shot is fired. the second time the trigger is pressed the gun goes 'Click.' The loudest sound you will ever hear if in a gun fight. "This is almost always caused by not seating the magazine completely. Since there was a round in the chamber, the gun fired the first shot like it was supposed to. "However, the magazine was not high enough in the magazine well for the slide to pick up the next round. The immediate action drill is to tap the magazine into place with the heel of the weak hand, rack the slide back with the free hand and allow it to go forward picking up the next round. "Focus on the front sight and pull the trigger."---Justifiable Homicide: The Intelligent Use of Deadly Force, Denny Hansen, 1966; pp. 59-60
Set-Up For Tap_Rack_Bang At The Range:Keep gun pointed down range; weapon empty; insert fully charged magazine but do not seat it. Rack slide back; press off safety; pull trigger; No Fire! Tap, Rack, Front Sight...Trigger Squeeze... Bang! Do this at eye level---keep threat in sight-plane.
Stovepipe: Gun fired; spent casing sticks up from ejector port like a stovepipe. Cause: Possibly too short an opening on the ejection port on some guns; weak hand grip; bad ammo. Solution: With free hand, grasp slide on top and at the same time placing the index finger against the empty casing to knock "stovepipe" from ejection port as the rest of the hand pulls slide back sharply throwing the empty case from the gun, and releasing the slide to chamber another round. FIRE!
Set-Up for Stovepipe at Range
Take empty weapon and keep it pointed down range. Pull the slide back enough to insert spent cartridge or charged round sticking straight up from the ejection port. Insert fully charged magazine.
Two Additional Ways for Stove Pipe Clearance:
With your non-dominant hand, as the weapon is kept in the sight plane, come over the top of the slide but not in front of the slide, coming in front of the Stove-Pipe, and as you rack back the Stove-Pipe with the web of the non-dominant hand, the frame is pushed forward, sending the Stove-Pipe careening into space, as a new round is stripped off the magazine and inserted into the chamber. Fire!
Bring non-dominant hand over top of slide; grasp the rear serrated portion of the slide with palm of hand and fingers; rack slide briskly back twisting weapon sharpy to its right side, flinging stovepipe away from gun and chambering a fresh round.
Slide Fails To Go Completely Into Battery (Chamber; Slide Fails to Close completely). You can see it slightly opened. Cause: Most often seen with reloaded/home loads ammunition and "dirty" gun, or "weakly-held pistol." Solution: Slap rear of slide with free hand, causing the round to go completely forward into the rest of the chamber and be seated. FIRE!
Set-Up For Slide Out-of-Battery
Take an empty weapon, keeping it pointed down range. Pull the slide back and drop a cartridge into the chamber. Slowly and gently bring the slide forward, allowing it to come to rest on the rear of the cartridge. Insert a loaded magazine into the magazine well. Aim gun, pull trigger....nothing happens. Take finger off trigger. Turn weapon's muzzle up and inspect the hood of the barrel. You will notice a large to a small gap where the barrel has not completed its journey up and locked in place at the ejection port. Push weapon back into the sight-plane and with your non-dominant hand, using the palm-heel, strike the rear of the slide right smartly, seating the slide into battery. Front Sight....Trigger Press!
Double-Feed or Feedway Stoppage.Cause: Two (2) rounds come out of the magazine simultaneously. One chambers; the other lodges in the ejection port keeping the slide from closing. It is about 3/4s to full opened. This causes extraction failure. Solution:
Lock the Slide Back.
Rip out (pull) the magazine, dropping it to the ground.
Work the action briskly several times, clearing the chamber and ejection port and causing any debris in the magazine well to dislodge and fall to the ground.
Insert new, fully charged magazine.
Pull slide back and release.
Now ready to fire.
Set-Up For Feedway Stoppage:
Take an empty weapon and keep it pointed down range.Lock the slide open and drop a cartridge into the chamber. Insert a fully charged magazine into the magazine well. Release the slide and gently ease it forward, until it stops. You have now created a condition (feedway stoppage) where one cartridge is in the chamber and another cartridge is trying to load.
:Four (4) Malfunctions To OverCome With the Auto-Loader When Training For The Real Thing
:Set-Up Conditions For Practicing at Range When Training For The Real Thing With a Double Action Auto and a Single Action Auto.
The above (a,b,c,d) demands a diagnosis and you may not have time to do that or you may be in the dark. Thus, when Training For The Real Thing, we no longer advise the above. But, if this is the way you have been trained and feel confortable with it, stay with it.
For this immediate action drill, how you handle this drill depends on whether you are shooting a single action auto, as in a 1911; or using a double action auto.
Single Action auto Practice for Immediate Action:
Pull the trigger, nothing happens. You hear the "Click" from the Hammer Fall.
Rack the Slide back, aim, squeeze the trigger; nothing happens. You hear another "Click" from the Hammer Fall.
Lock the slide back.
Remove magazine.
Rack the slide back several times to clear debris, fouling, and/or double-feed and chambered round from gun.
Grasp a fully charged fresh magazine and insert it into the magazine well.
Rack the slide back and let go--do not ride the slide forward; can cause a stoppage.
Aim, point gun, squeeze trigger--bang! You are back in the fight.
Double-Action Auto:
Squeeze trigger; all you hear is the "click."
Squeeze trigger again, "click" or "bang."
If "Click" and no bang on #2,
Rack slide back to chamber a new round.
If no "bang," only the sound of your squeezing the trigger,
Lock slide back.
Rip out magazine!
Rack Slide back several times to remove any fouling/stuck shells/ect.
Grasp a Fresh, fully charged magazine.
Insert magazine into gun.
Rack, let go.
Front Sight, trigger squeeze, bang.
: Immediate action. No diagnosis necessary. For any of these drills, keep the gun at eye level when performing these actions. You don't want to lose sight of the threat; keep him in your visual plane. Also, the conditions may have changed such that you don't always fire automatically, reassess the situation. Do not get in the habit of automatically firing when you finish this drill. Conditions may have changed. You may shoot an innocent bystander. Be sure of your backstop and your surroundings.
Mossberg Model 88 Maverick Security, 6-Shot, 18.5-inch barrel (inexpensive shotgun for home defense that also
shoots slugs: Mossberg 12 Gauge
The Rat Hole Shot! This Is Made Using Bird Shot; However, As the video shows, the shot spreads out too wide after 21 feet. At 75 feet, it may be so wide it creates a circle around the individual. That is the time to go for a quick Amino Switch to a ShotGun Slug!
In a hostage situation; first, if possible, call 911. When the Hell Breaks, hopefully, the police get there; they will evaluate the problem and possibly call for a hostage negotiator--if their department has one--and contain the situation from escalating. However, one thing is salient: Watch This For The Answer
Mossberg Model 500, (American Field) 6-Shot, 26-inch barrel, All Purpose 20 Gauge. Excellent shotgun for small-frame persons. Has more power than a 44 Magnum Revolver at 21 feet or less.
Because of the long barrel, unless you practice indoor techniques, the barrel will invariably get hung-up on something. Find a good self-defense rifle instructor who knows indoor fighting and will teach you low-ready and indoor low-ready or repressed muzzle for cornering techniques for proper use of handling a long-barrel rifle for indoors. Now, let's look at the 20 gauge shotgun in action.
Slugs:
Which Slug Is For YOUR Shotgun?
By: Dr. Charles S. Brocato
When you go to the ammo store to buy slugs for your shotgun, how will you know which particular slug to buy? If you study what's available on the shelves, you will soon discover that there are basically two types of shotgun slugs: Rifled and Sabot. What is the difference? Which one do you need?
What Is A Slug?
Basically, a slug is a bullet that is delivered by a shotgun. Most shotgun ammunition consists of shot, which are a group of little round balls like BBs, of various sizes. The size of shot you buy depends upon what game you intend to hunt, or whether you're shooting at clay targets.
Since a slug is a single bullet, delivered with all the power of a shotgun, usually slugs are used in hunting medium-sized game such as deer at fairly close ranges.
Self-defense shooters like a slug for targets at a greater distance than the usual inside-the-home distances for shooting.
Since a slug is a large bullet, it strikes a target with greater force than shot and penetrates deeper. A shotgun slug is about twice as large as a .30-06 bullet.
Here are the major differences between the two types of slugs and which shotgun each type does best with.
Rifled Slugs
A rifled slug has angled grooves around its body. These grooves are supposed to cause the slug to spin, but although slugs do spin, they do not achieve the rotation needed to deliver greater trajectory and accuracy. The rifling actually allows the slug to fit through different chokes.
Rifled slugs are designed to be shot by smooth-bore shotguns. Beyond about 75 feet, you can't achieve very good accuracy. Shooting A Rifled Slug In A Rifled Barrel May Damage The Barrel's Rifling.
Sabot Slugs:
Sabot (pronounced say-bo) slugs are slugs encased in a plastic sleeve that covers the entire slug inside the shell. When the sabot slug shell is fired, the plastic sleeve spins inside the barrel and the shotgun's barrel rifling causes the slug with the plastic sleeve to spin. This spin gives the slug greater accuracy and allows it to travel further, extending its range.
Sabot slugs should be used if you have a shotgun with a rifled barrel. The rifled barrel is what allows the sabot sleeve to achieve the spin that gives the slug greater distance and accuracy. Shooting Sabots in a smooth bore shotgun is a waste of money and delivers no extra accuracy.
What Slug Should You Use With Your Shotgun?
If you have a smooth bore shotgun, you should use rifled slugs. But you can also shoot sabot slugs through your smooth bore and not disturb your shotgun barrel. Sabot slugs, however, are more expensive than rifled slugs, and used in a smooth bore shotgun, they will not deliver any extra accuracy or distance. You are essentially paying more for a shell that will not give you any extra advantages.
If you have a rifled bore shotgun, you should only use sabot slugs. These will deliver the extra accuracy and distance you want when used with a rifled bore. You should not use rifled slugs in a rifled bore. The grooves in the rifled slug may possibly damage the rifling of your rifled bore.
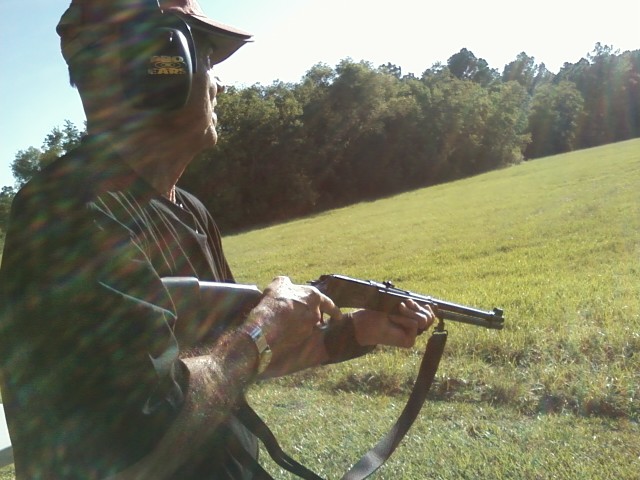
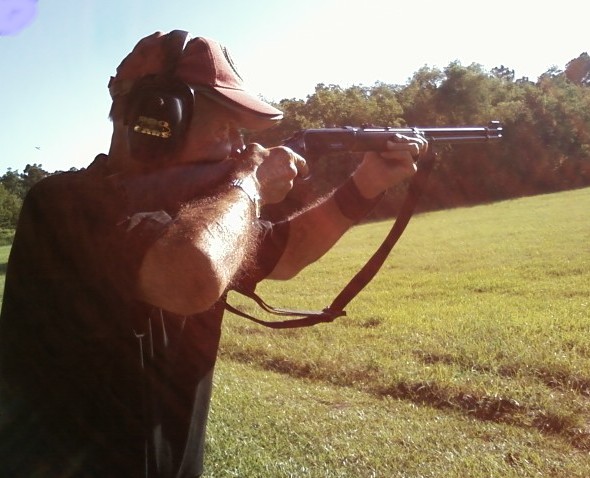
An AR-15 Bushmaster Carbine with Telestock Workout, Utilizing .223 Neck Sling For .357 Magnum Backup.
The AR-15 Workout UsingProne And Other Positions. Subjects also demonstrating "Tactical" & "Speed" Reloading.
Gun Fights Are So Common In Sao Paulo, Brazil, Pedestrians On The Street Just Watch Nonchalantly . Here, The Police Are Having A Shoot-out, Using The AR-15/M16A2 Weapon, As A Citizen Watches!
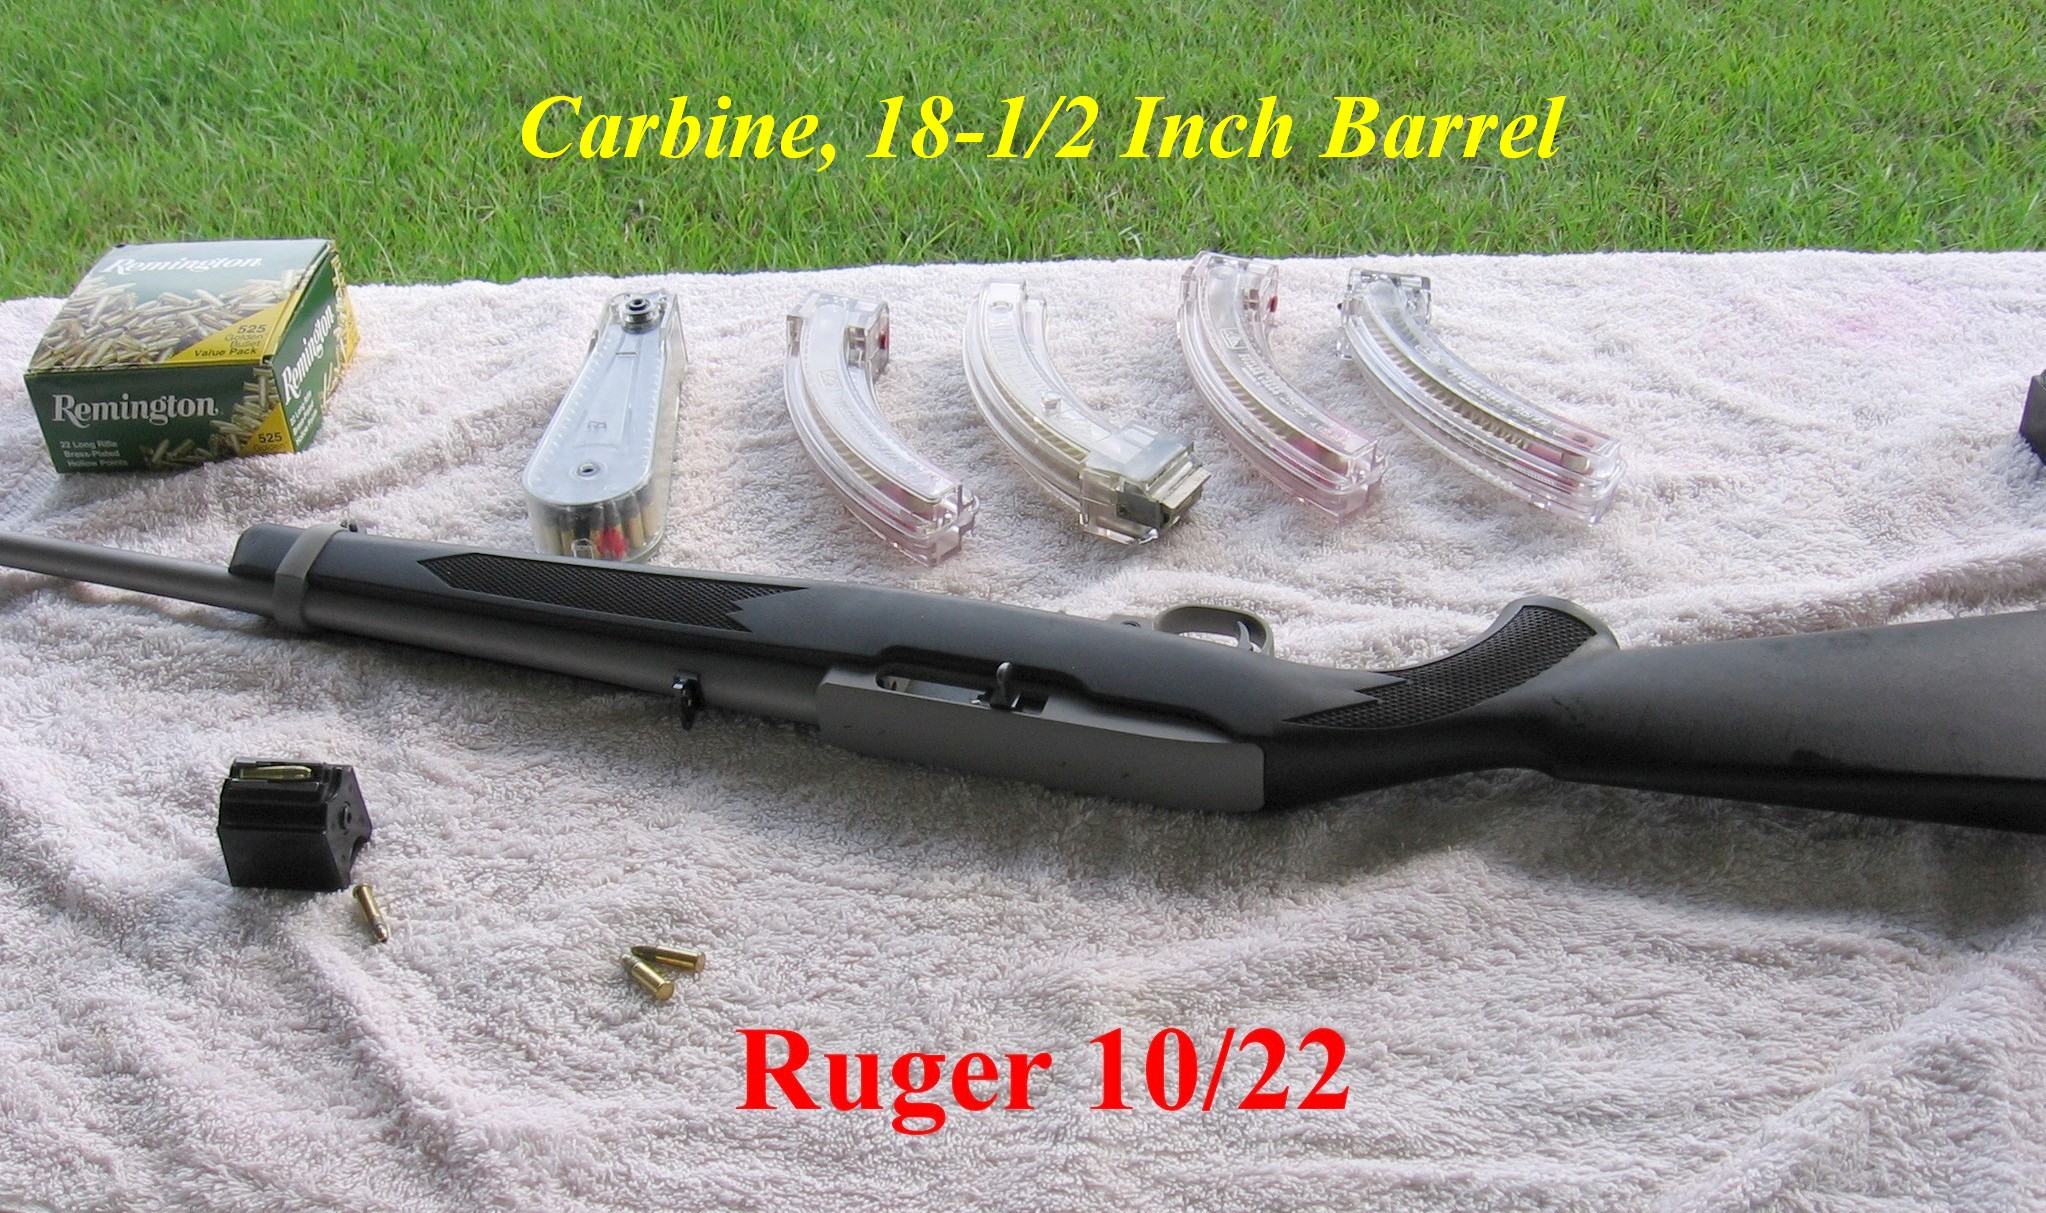
A .22 Long Rifle that shoots .22 Long Rifle cartridges. This is for the varmints coming and doesn't waste precious ammunition that may be necessary to defend what you have against marauders. Ammo will be in short-shrift when this all goes down. This appears to be happening now.
However...See The Following Concerning 0.22 Shooting:
You could skip the .22 Long Rifle if you get the Bushmaster carbine, then you should have for your AR-15 rifle a .22 long rifle conversion unit.
This is an excellent way to teach responsible members in the family. This is for training and varmint practice, as well as teaching yourself the manual of arms of the weapon, and to do plenty of varied practice shooting with scenarios, using .22 LR cartridges without the expense, loud noise and more recoil associated with .223 cartridges. Here, we see the shooter running 'dry' and presenting a New York Reload.
You can get the conversion unit from Delta Force at 1-800-852-4445, or go to www.deltaforce.com. You want to get the Ceiner AR-15 or CAR-15 .22 LR conversion kit (both are Atchisson conversion kits) with a 30- round magazine, and order a spare 30-round magazine for the unit.
For those of you in California where there are extremely strict gun laws and you cannot own a so-called "assault rifle," this conversion unit would be ideal because of the following:
"In 1999, the California legislature passed an all encompassing bill outlawing the sale or possession of "assault rifle." Exceptions were those semiautomatic, high capacity magazine rifles not previously banned by the 1989 law and which had been duly registered, and those semiautomatic, high capacity magazine rifles not on the 1989 list and which were in the owner's legal possession before January 1, 2000, and registered before January 1, 2001.
"In effect, the law banned all further acquisition of military style, semiautomatic, high capacity magazine rifles. It also made it illegal for anyone under 21 to possess or register such rifles--which shut down all junior service rifle teams in the state on the first day of the new century and severely limited participation in service rifle and other match competition by law-abiding citizens.
"The law did, however, exempt semiautomatic .22 rimfire rifles, no matter their configuration. In a conversation with the California Department of Justice, Firearms Branch, the author was told that a .22 caliber rimfire AR 15-type rifle would continue to be legal in California as the law specifically exempted .22 caliber rimfire rifles and pistols. Also, that a .22 caliber rimfire upper receiver placed on a standard AR 15 lower receiver would remain legal as the rifle was no longer in the banned category category by virtue of the fact that it now fired a .22 caliber rimfire cartridge--providing the lower receiver was not banned by the 1989 law or had been legally registered at that time. And finally, that the .223 upper receiver would not have to be registered as it was not a 'firearm' as defined by law.
"So there you have it, Californians. Keep your AR 15 rifle registration-free by substituting a .22 rimfire upper barreled receiver for the .223 barreled receiver. Shoot the .22 within California's borders, and the .223 without."--Joe Poyer, The M16/AR15 Rifle, A Shooter's and Collector's Guide, 2nd Ed., Page 99.
Cleaning The AR-15 Gas Tube
Shooting .22 LR through your AR-15 can result in lead build-up in your AR-15 Gas Tube causing "Short Cycle" when you shoot .223 cartridges through the weapon. Therefore, it is advisible to shoot three or four rounds of .223s after every three to four-hundred rounds of .22s.
As a regular practice, we have our students remove the Gas Tube and clean it. This is something many owners of AR-15 don't do---remove the Gas Tube from the AR-15 and physically clean it.
Do it this way:
Using a "Handguard" removal tool or use the "Buddy System" and remove the handguards.
Separate the Upper Receiver from the Lower Receiver.
Gently drive out the gas tube retaining pin.
Using either a strong grip or using smooth jawed pliers; or use a gas tube removal tool (best) and remove the gas tube.
With the gas tube removed, using an eyedropper, place an eyedropper or two of lead solvent in the lower receiver end of the gas tube and covering both openings of the gas tube with your fingers (wearing solvent resistant gloves),
tilt to one end; and then to the other, to saturate the inside surface of the gas tube with lead solvent.
Place the tube down on a hard surface in such a way as to not let any solvent escape. Let the gas tube and solvent rest while you clean the rest of the gun.
Using Brake Cleaner, blow out the solvent toward a safe direction. Then insert a long pipe cleaner made for this purpose from Brownells (800-741-0015) World's Largest And Most Trusted Supplier of Firearms Accessories and Gunsmithing Tools, into the Gas Tube fully and twist gently and then remove.
Re-insert your gas tube into the upper receiver and replace retaining pin at the front sight. You are now ready to enjoy your shooting practice and be prepared for "When The Hell Breaks."
The gas tube removal tool and other accessories for your AR-15 can be purchased from Brownells.
Elevation: Using a Front Sight Tool To Lower The Point of Impact On Target: Match the end or inside of the tool to the front sight post; insert and turn CounterClockwise, Raising the front sight post, which Lowers the Impact.
Remember The Nemonic: CCW Lowers Impact!
Elevation: Using a Front Sight Tool To Raise The Point of Impact On Target: Match the end or inside of the tool to the front sight post; insert and turn ClockWise, Lowering the front sight post, which Raises the Impact.
Remember The Nemonic: CW Raises Impact!
Windage: Using A Small Nonmarking Gunsmith Hammer or Rubber Mallet & Brass Punch, So As Not To Mark The Weapon, Horizontal Adjustment Can Be Made By Doing The Following:
If You Are Shooting To The Left of The Sight Picture (Group of Shots Are To Left of Where You Want To Hit), Strike With The Mallet & Brass Punch from On The Left Side of The Sight Seat To Move The Shot Group To The Right.
If You Are Shooting To The Right of The Sight Picture (Group of Shots Are To Right of Where You Want To Hit), Strike With The Mallet & Brass Punch From On The Right Side of The Sight Seat To Move The Shot Group To The Left.
In using deadly force, first: know your local and state laws for using deadly/lethal force. Second, know the manual of arms of the weapon you carry. Third, all U.S. States now have concealed carry provisions for its constituents---become a Concealed Carry now, if you don't have this, for self-defense reasons and learn the "carry" laws of your jurisdiction.
There are a number of things you need to know if you are ever in a gunfight. We only give four major ideas here:
Tactical Errors:
Failure To Correctly Assess the Threat
Failure To Control the Subject
Failure To Watch His Hands
Failure To Use Cover
Failure To Shoot Soon enough
-----The Snubby Revolver--Ed Lovette; p. 78 -----The Tactical Pistol--Gabriel Suarez
Six Principles of Gunfighting:
Tachy Psyche (Speed of Mind)
Four Elements That Must be Present To use Lethal Force (ability, opportunity, imminent jeopardy, preclusion). And you must take the above into consideration with these 3
elements: Number of Attackers, Weapons, and Innocent bystanders.
"How Close is Too Close?" 21-feet is too close because an assailant can close the distance within 1.5 seconds. It takes a very skilled shooter around 1 sec. to present his weapon and respond. How skilled are you?
Tactical & Legal Decisions of Shooting
The Defensive Mission of the Handgun
Mind-Set
What Gets Innocent People Killed In Gun Fights:
"Remember above all that the thing that kills innocent people in gunfights is their own morally-inbred hesitation to kill fellow beings. It is not a consideration shared by the criminals the private citizen may someday face."---In The Gravest Extreme. Massad F. Ayoob, p. 117.
What Shooting Is:---Stressfire. Massad F. Ayoob, p. 8. And his videos.
Shooting is a complex set of motor skills whereby a number of things must be brought to bear in split seconds.Those skills involve Movements that must be executed (Coordinates) to line the gun up with the target (indexing). Coordinates:
Stance
Grip
Sight Alignment
Trigger Squeeze
Breath Control (no longer taught in most shooting circles because this happens automatically)
Follow Through--for a fraction of a second so as not to sling the projectile
An Attitude To Avoid
DEA Agent, Lee Paige "...was giving a lecture to a 4th grade class in 2004 when he ran into a little mishap. He was explaining to the class that he was the only one in the room who was enough to carry a gun, when his little listeners heard a loud bang..."---The Gun Owners, May 29, 2006; p.4.
What Safe-Gun Handling Rules Did Mr. Professional Break? Review The Video Clip Again, Then ClickHere for your Answer.
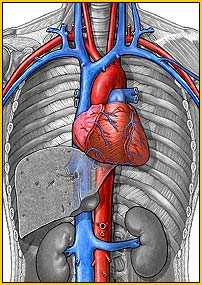
Shoot for the "Center Of Mass":, where the heart and great blood vessels congregate.
Don't assess. If the target doesn't drop out of the pistol's sights, simply raise the sights and shoot for the Cranial Vault, to the Brain-Stem Area.---The Tactical Pistol: How To Improve Your Combat Shooting Skills, Gabe Suarez; p. 147.
In some rare instances, the threat may keep on attacking towards you with lethal (deadly) force. He may not know he should have been incapacitated by now! He probably didn't read the book. Actually, your shots may have missed the target. This is why you need training in cover, movement, concealment, and distancing. Know now,
"When you double your distance, you double your chances of survival."
We did not say you would not get shot!
We do not advocate shooting to the "Pelvis," in hopes of causing the assailant to fall to the ground. In most instances, the bullet just punches through the pelvic bone region and the threat that is hell bent by now on getting you, keeps aggressing in your direction, throwing lead in your direction or wielding a blunt or edged weapon to use against you once he gets in close enough range of your person.
In such rare cases, we advocate, using your knowledge of cover, movement, and distancing, to learn shooting on the move and shoot for the Neck of the Femur.
In other words, a well-placed shot or more will break the Neck of the Femur causing an instant "broken hip syndrome." He should go down with only one leg to stand on but he is not out of the fight. Assess the situation and respond accordingly.
Most reading this do not know where the Neck of the Femur is located. After seeing this picture, draw up on targets similar and practice from a stand still position first; then, as your skill and acumen increase, practice shooting to the Neck of the Femur when moving laterally and away from the threat.
Neck of Femur . This is the short mass of bone tissue of the femur serving as a bridge from the femur proper to the head of the femur. In other words, a short bridge of tissue connecting the leg to the pelvis. In the elderly, when they fall and break their hip, they are diagnosed with a Broken Hip. What is actually broken is the Neck of The Femur.
Use no less than a nine millimeter (9 mm); better yet, use a .45 Caliber. You want a big bullet carrying enough mass to do what you expect it should do.
Incapacitation! Practice & Train Intelligently Under Professional Instruction. You Must Also Be Taught Mental Conditioning To Be Used Every Moment of Your Life For When Suddenly, You Find Yourself In A Combat Situation...But...You Were Prepared To Recognize IT'S Coming! And, Learn The Asymetrical Principle.
Next Time Someone Cries "Foul" Because You Presented Your Gun In Low-Ready Position, and All They Had Was a Knife, Show Them This Picture.Warning: This is Graphic
The Bang Scenario. Why You Need Cover, Movement, Concealment, and Distancing Instruction.
Gun Grab: Given To Illustrate There Are Things You Can Do. Get Training. Only One Item Illustrated.
What One Community is Doing About Guns Now, For When The Coming Hell Breaks.
Another Reason You Want A .357 Magnum and More. Early Church Saints Were Told That In The Far-Distant Future (Our Time), Nature Will Turn Against You.Knock...Knock
Castle Doctrine Resolution in Garland, Texas, that "...one should not be expected to retreat from an attack within one's home before resorting to the use of force to repel the attacker."---JPFO
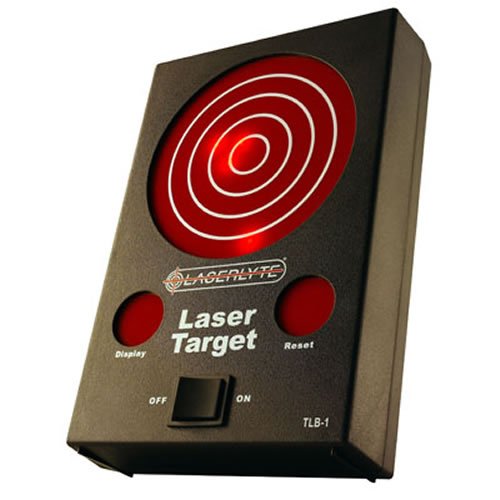
The Laserlyte Target Training System is a unique training system designed to be used at home with your 9 mm or .45 auto. It utilizes a .45 cartridge laser light shaped object like a .45 cartridge to shoots a laser light to a laser light target. It saves money; time travel to and from the range, and improves accuracy against single or multiple threats. Here is what Laserlyte says about the product on Amazon.
Laserlyte Laser Trainer Target
Become a crack shot without spending cash on expensive training ammo with the LaserLyte Laser Trainer Target. Designed for use with LaserLyte's popular line of laser trainers--including the original Laser Trainer, the Laser Trainer Pro, and the Laser Trainer Cartridge--the interactive Laser Trainer Target records precisely where a laser hits, helping save time, money, and ammunition. With the target, you can learn or teach such shooting skills as unsighted fire, accuracy, grouping, and trigger control. The target is also fully portable, so you can practice shooting skills almost anywhere, even from a favorite recliner.
To use the Laser Trainer Target, simply aim at the target and dry fire the weapon with a LaserLyte laser trainer. The target will record the shot for later feedback, so you can concentrate on the next shot rather than the last shot--just like at the shooting range. When you're ready to see the impact, just dry fire the laser at the red "Display" circle on the unit's face. The target will show you the precise spot your shot would have hit with live ammo. To begin with a fresh target, aim the laser at the red "Reset" circle and dry fire again.
The Laser Trainer Target runs on three AA batteries--good for about 6,000 shots--and can register shots up to 50 yards away. The target contains 62 laser-activated LED lights and operates without the use of a computer, TV, or projector.
Specifications:
Compatible products: Laser Trainer Pro, LT-1, LT-9, LT-40, and LT-45
Batteries: 3 AA
Battery life: 6,000 shots (LED activations)
Range: Up to 50 yards
Dimensions: 6.25 by 9.5 by 2 inches (W x H x D)
Weight: 1 pound 4 ounces
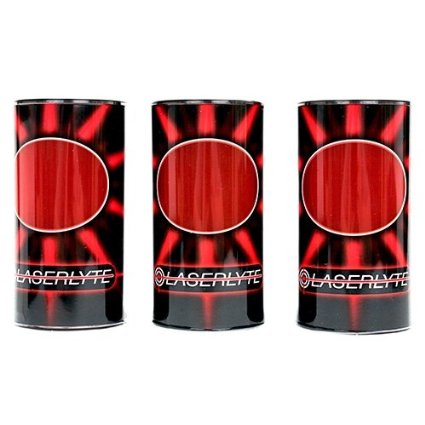
The company also has the Laserlyte 'Tin' Cans To Lasershoot
Laserlyte Tip Over Can Set
LaserLyte introduces the innovative and entertaining Laser-Plinking-Can 3-Pack Set.
When hit with a laser from any of the LaserLyte training cartridges or other laser trainer tools, the cans react by jumping up and falling over just as a real can would. This reaction is all powered by a 9V battery (included) and a spring loaded plunger released by a solenoid.
To reset the cans, simply stand them up and depress the plunger. The LaserLyte Laser Plinking Can Set provides hours of training and entertainment indoors or outdoors without the cost of ammunition or the clean-up of cans after the fact.
Laser Plinking Can Set is sold in a three-pack with three 9-V batteries included. One battery will tip the can over about 8,000 times. The LaserLyte Laser Plinking Can gets sport shooters and professionals on the target faster, increasing accuracy and overall hits.
Specifications:
 Target.JPG)

![[Revolver(color) Pointing At You]](revolver (color) pointing at you.jpg)